How to Signup & Configure RealBooks Accounting Software?
Assuming that you are new to Realbooks and you want to configure online accounting software Realbooks, your search ends here.
RealBooks is one of the best accounting software in India on the cloud platform with a robust accounting system architecture.
And capable of delivering hundreds of concurrent users for enterprises both large and small.
The app hosted on Amazon Web Services exemplifies top-notch security online by Amazon Web Services.
AWS giant is the world’s most comprehensive and broadly adopted cloud platform.
It delivers and offers cloud storage to over 165 fully-featured services from data centers globally.
Millions of customers including the fastest-growing startups, largest enterprises, and leading government agencies trust AWS to power their infrastructure, become more agile, and lower costs.
RealBooks is a cloud application with the AWS database, so basically you are storing your data on the AWS Server
If you are new to RealBooks consider joining RealBooks for free right here and right now without any credit cards asked.
So that you could look at how to configure RealBooks quickly in minutes in this guide.
It is very simple to use, but before you start any transaction, you require the necessary setup and configuration to start RealBooks for your Business.
So the first step is, to register your business and then configure your Business Place and create tax ledgers (VAT/GST, etc.)
Secondly, you can create all other ledger accounts, your store locations, inventory, UOM, etc.
And all these basic steps will prepare you to start RealBooks with ease.
Here this step-by-step guide will assist you to register your business and configure your software easily for you in minutes.
Who Should Use RealBooks & How to Configure RealBooks?
I think if you are an entrepreneur having a few skills in finance and accounting is wonderful because business is all about assets, liabilities, incomes, and gains.
So keeping your own accounts handy with you is great, you get to see how your business is doing and compare performance daily weekly, or monthly.
Today’s accounting systems are not just for accountants or CA’s, if you are a true entrepreneur you will always love to keep your accounting handy with you.
In a few years’ time from now, AI will take us by storm and all software will have the ability to forecast everything to you about your enterprise better than humans.
If you are just aware of how to enter a few types of vouchers, you can do it all by yourself, because the software is computing everything for you at the end of the day.
Therefore adopting online accounting software and systems such as RealBooks is a great advantage for your business.
RealBooks is free forever for a single user with up to 500 entries a year, so you need not worry about paying anything first. However, the company’s policy may change anytime.
Simply signup and configure your business account and you are all set to go, simply start with full-fledged accounting, billing, and invoicing for your enterprise.
I will guide you through the process so that you will be able to do some basic configuration and prepare yourself for billing and accounting.
There are a few step-by-step processes to configure RealBooks for your business. So let’s get started.
Here are some of the configurations that you need to configure before using RealBooks and RealBooks Apps for the first time.
1. Setup & Configure RealBooks Company Info.
When you click on the Join Now button on RealBooks official site or our page you will see the following screen
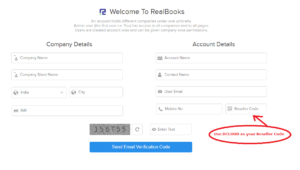
So enter your Company Name such as ABC Textiles Pvt. Ltd.
Enter your company’s short name, you can use the first 3 letters of your business name or as you want.
Fill in the city name, account name, contact name, business email, mobile number, and Reseller Code as ” DCLOUD”
A Note On Reseller Code:
D-Cloud Solutions is an authorized re-seller, training, and implementation partner for RealBooks. RealBooks is a product of Adansa Software Solutions Pvt. Ltd.
If you have found us and you wish to join RealBooks you may use the Re-seller Code as “DCLOUD”.
And you can get basic implementation support also from us free of cost with no additional charges as the cost of your subscription remains the same.
So after filling in all the details enter the captcha and hit send email verification code.
RealBooks automatically sends you the code in your email
The code will be emailed to you on your email ID. Look up your email and you find a 6-digit code from RealBooks Official.
Enter the 6-digit code and your business account will be set up within a few seconds with a welcome dashboard as shown below.

And now you update your company master by navigating to Masters -> Accounts -> Company -> Edit
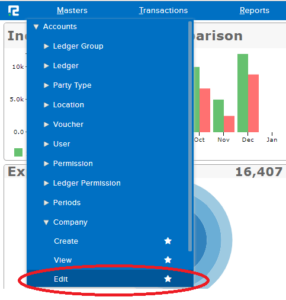
After you click on the edit button, find the pencil button at the end to your right. This will help you to update your address and bank account information.
Remember to enter your state and city which will be the basis of your SGST (State Goods & Services Tax)
And enter every information you want to update, hit save and you are done with setting up your company.
2. Configure RealBooks Compliances
The Goods and Service tax forms the basis of your compliance, i.e. GST tax structure set up for your business.
To activate GST you have to navigate to Settings -> Compliance -> Enable GST
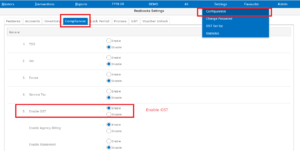
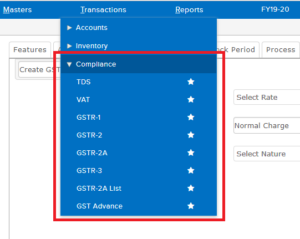
After you enable GST you will be able to find tax compliance reports on the Transaction dropdown.
GST will be activated soon on all accounting vouchers.
So you will be able to find all the tax-based reports related to India GST.
RealBooks is ready with all GST Reports such as GST 1 for sales, GST 2 for purchases, and GST 3 for Net Payable Amount that is liable to pay to Govt. monthly or quarterly.
And you get all of these reports with a click of a button.
3. Configure RealBooks Business Place & Tax Ledgers
The third step, of course, is configuring your business place and tax ledgers. Your business place is the state where your business is located.
As per GST, every state has its own GST State Code, and this identifies whether you are invoicing within the state or outside of the state.
The business location configuration defines how your system uses SGST, CGST & IGST during auto invoicing.
So without configuring your business place and tax masters, you won’t be able to make any invoices & vouchers correctly.
You can set up your business place and tax ledgers from Settings -> Configuration -> GST
To configure the business place select the business place setup from the drop-down and fill in the details such as an address, business place name, state, type of business (Regular/Composition/ ISD), etc.
If you have multiple business places there is also a provision to create segments i.e. managing multiple businesses under a single company.
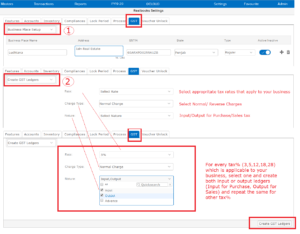
There are 3 different combinations on which your tax ledgers can be created
Tax per cent
There are different percentages of taxes for different businesses, so create your tax ledgers only for those percentages which apply to your business.
Charge type
There are 2 different types of charges for creating taxes i.e. Normal Charge & Reverse Charge
The normal charge is usually for all registered dealers, traders, and manufacturers.
Whereas reverse charges tax configuration is required for you to create if you as a registered business are transacting with an unregistered business.
To keep track of transactions with that of unregistered dealers.
You need to create reverse charge tax ledgers with the help of this simple reverse charges mechanism.
Nature
The nature of the tax ledgers indicates input tax, output tax, and advance tax.
Suppose you 5% on sales items and 5% on the purchased item, so you have to select
Tax Percent = 5%
Charge Type= Normal
Nature= input, output
This will create your input ledgers as SGST-Input @ 2.5%, CGST-Input @ 2.5% & IGST-Input @ 5.0%
And output ledgers as SGST-Output @ 2.5%, CGST-Output @ 2.5% & IGST-Output @ 5.0%
Similarly, if you want to create a reverse charge tax ledger of the same 5%
Tax Percent = 5%
Charge Type= Reverse Charges
Nature= input, output
This will create your input reverse charges ledgers as SGST-Input-RCM @ 2.5%, CGST-Input-RCM @ 2.5% AND IGST-Input-RCM @ 5.0%
And output ledgers as SGST-Output-RCM @ 2.5%, CGST-Output-RCM @ 2.5% & IGST-Output-RCM @ 5.0%
4. Configure RealBooks Vouchers and Numbering
The fourth step of the configuration includes voucher configuration. There are several vouchers inside RealBooks accounting software.
If you are aware of accounting vouchers it is easy for you to become familiar with it.
The different types of vouchers include
- Receipt Voucher
- Payment Voucher
- Sale Voucher/Invoice
- Purchase Voucher/Invoice
- Journal Voucher
- Contra Voucher
- Debit Note
- Credit Note
- Advance Receipt
- Service Invoice
Voucher configuration includes setting up your voucher series, and enabling prefixes or suffixes to your voucher numbers for your own logical purpose.
So before you start to do any entry on vouchers, configuring the voucher series is important.
The configuration is a one-time process and you would never have to configure it again until the year changes.
However, if you wish to keep continue with your existing series at year-end, you can keep your series unaltered.
Both of the options are available.
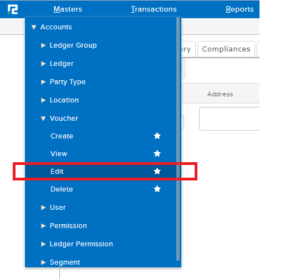
To configure your vouchers navigate to Masters -> Accounts -> Voucher -> Edit and set up your voucher series.
Suppose you want to configure your sales voucher series starting from 1000 and include Prefix TI and Suffix 2019-20 to it.
Your series will concatenate to TI/1001/2019-20 and it will start to increment automatically as TI/1002/2019-20, TI/1003/2019-20 to TI/n/2019-20 after every invoice you save.
So this sequential numbering can be set for any vouchers with prefixes and suffixes.
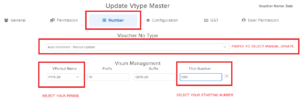
Therefore how to set these numbering in RealBooks. Find these five basic attributes below to help you do that.
- Update Voucher Type
- Voucher Period Name
- Prefix
- Suffix
- First Number
Benefits of using Prefix and Suffix:
It is not mandatory to use suffixes or prefixes, however, suffixes and prefixes provide a clear picture of your accounting data in the long run year on year.
So you may include the Voucher Short Name in Prefix and the Financial Year in Suffix.
Suppose you are configuring a number sequence for the Journal Voucher.
Your idea may be to configure it with a combination of VPeriodName+Prefix+Suffix for example JV/1001/2019.
So what it indicates is a Journal Voucher with (Prefix: JV), sequence First Number as 1001 and it belongs to the year 2019 (Suffix:2019), clear and simple to understand.
For more options, you may email or call us for any kind of setting that you would like to configure.
5. Create your first ledgers (sale, purchase, customers, suppliers, bank)
The general ledger represents the five main account types: assets, liabilities, income, expenses, and Capital.
And under ledger groups, there are unlimited ledgers that fall under a specific ledger category/group.
Create your first ledger in RealBooks following Master -> Ledger -> Create Ledger

To illustrate an example, let us consider creating a specific ledger head say Mobile Expenses, so when you create such expenses you need to specify its ledger groups which in this case would belong to Indirect Expenses.
So to maintain your books of accounts you have to create ledger accounts of all transnational activities that occur in your business.
For every debit recorded in a ledger, there must be a corresponding credit so that the debits equal the credits in the grand totals.
Creating a ledger account is simple in RealBooks, ledger creation is a one-time activity that you need to define for your business and create in your system.
To create a ledger go to Masters -> Ledgers -> Create Ledger and it will open up the Ledger master form.
This will enable you to create your ledgers where your particular ledgers will ultimately fall into an asset, liability, equity item, income, or expense type.
To keep it simple and straight, let us understand which ledger to create first to get started.
What are the Basic Ledger Accounts?
Basically, there are 5 types of ledgers that you need to create initially to start using RealBooks for Invoicing.
- Sales A/c under Sales Ledger Group: Examples of Sales A/c can be simply Sale/s or you can create it head wise such as Sales 5%, Sales 12%, Sales 18%, etc. and all these ledgers shall come under Sales Ledger Group
- Purchase A/c under Purchases Ledger Group: Examples of Purchase A/c can be simply Purchase/s or you create different Purchase Ledger heads such as Purchase 5%, Purchase 12%, etc.
- Customer A/c under Sundry Debtors Ledger Group: Examples of Customer A/c, are your real buyers such as ABC & Company, XYZ, and Company, etc.
- Supplier A/c under Sundry Creditor Ledger Group: Examples of Supplier A/c are M/s. ABC Supplies Limited etc., these are your real vendors and suppliers from whom you buy raw materials, semi-finished or finished products.
- Bank A/c under Bank Ledger Group: Examples of Bank A/c, are your bank accounts such as HDFC Bank, Axis Bank, ICIC Bank, etc.
And later on, you can create any number of ledgers such as expense and income ledgers depending on your needs
To maintain your account you also have to create various ledgers that fall under expenses and incomes.
Ledger groups are already created and available by default in the system.
Therefore you need to choose the correct ledger group for which the ledger account is created.
However, you can also create ledger groups if something is missing and you cannot find the appropriate ledger group name.
Do check it once properly by navigating to Masters -> Accounts -> Ledger Group before you try to create any ledger groups.
6. Create and Configure RealBooks UOM (Simple or Complex)
The sixth step is to create the Unit of Measurement. It is the base of all items in which an item is stored in terms of its inventory.
You can create Units in RealBooks from Master -> Inventory -> Units.
UOM created here shall be reflected in your Item Master while you start to create your items and products
So check it up, if all the necessary Units are created for your inventory uses.
UOM can be of two types, Simple or Complex.
Simple UOM: A simple UOM has no dependencies as it exists individually. Examples of Simple UOM can be Each, Piece, Litre, Kilogram, etc.
Complex UOM: A Complex UOM is a basis for the conversion of one UOM to another UOM.
A complex UOM is the same as a simple UOM.
However, it has multiple dependencies to convert a simple UOM into its dual or more complex units.
Let us illustrate it with an example:
Suppose your base UOM for an item is a Dozen, so if we equate it in term dual UOM, it is measured as 1 Dozen = 12 Pieces.
So the basis of such duality or complexities forms the Complex UOM where it is converted in terms of both UOM whenever it is required.
1 Dozen = 12 PC and 1 PC = 1/12 Dozen
7. Enter your Items/ Item Groups
The product master in RealBooks allows you to define all of your items and configure input and output tax.
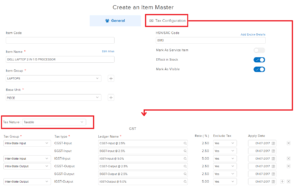
But before you define any of your items/products make sure you segregate all item groups and categories under Master -> Inventory -> Item Group.
Examples of Item Groups include Raw Materials, Semi-Finished Goods, WIP Goods, Consumables Goods, Finished Goods, etc.
However, you have to categorize your Item Group depending on the type of industry or products you deal in.
Consider Item Groups as categories of items or top-level group names of any item.
Suppose you deal in a variety of fans you can either consider Fans as the top-level Item Group or you can consider Ceiling Fans, Table Fans, etc. in detail as your Item Groups.
It all depends on how you want to see your group report in sales analysis.
So after you have created your item groups you are ready to create your items and it will help you to fetch the groups from the list.
There are 2 ways in which you can enter your items, one is manually or by using the bulk import wizard through Excel sheets.
For bulk importing you can activate the import-export setting configuration which you can find under general -> data import and export.
So in this section, you will find ready-to-use download templates that you can download and prepare your sheet.
This will help you to exercise your items and inventory on the Excel file and upload it in one go.
The import-export option provides you many options to import and export data XML and EXCEL files.
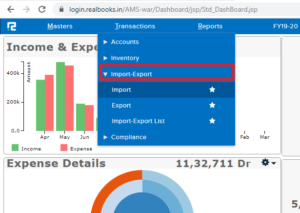
This includes importing and exporting data related to Ledger Master, Opening Balance, Cost Center, Item Master, Accounts Voucher, Bank, Inter Branch Transfer, Multi Branch Transfer, and Opening Balances.
8. Setup & Configure RealBooks Inventory Locations (Stores/Bins/Racks)
You can describe your Locations in RealBooks to identify the inventory location.
Locations can be your Godown or your storage areas within a Godown, you can also create your Godown in terms of Racks or Bins.
For Example:
Godown A – Rack 1 – Bin 1
Godown A – Rack 1 – Bin 2
and Godown B – Rack 1 – Bin 1
Godown B – Rack 2 – Bin 1
and Godown C – Rack 1 – Bin 1
Godown C – Rack 3 – Bin 1
and so on.
However, creating a Rack or Bin in Godown Master as described above is not realistic, because RealBooks is not a full-fledged ERP software.
But it is ideal to work with Racks and Bins in this way if you are using RealBooks.
This will help you to identify your different inventory locations.
9. Configure RealBooks Auto/Manual GST Calculations
Configuring a RealBooks voucher is easy and it is a smart way to control your voucher numbering format and series.
As already described in Point No. 4 you now know how to configure vouchers and numbering for a particular voucher.
The same voucher configuration wizard can be used to configure Goods and Service Tax for manual or automated tax calculation by selecting the appropriate formats you wish to choose.
So before we proceed to create a tax invoice or any other invoice make sure to check the configuration wizard is properly set to automatic calculation as shown below.
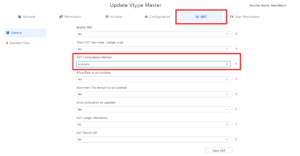
That being said you can just configure a particular voucher by enabling GST by enabling the configuration Enable GST to ‘Yes’.
And if you want to track the GST ledger set the Track GST Item wise / Ledger wise to ‘Yes’ and GST Computation Method to automatic.
10. Configure RealBooks Invoices (Sales/Purchase/Returns/Proforma)
Generally, when we talk about Invoices, there are 5 types of Invoices in RealBooks accounting software.
These are the Proforma Invoice, Sales Invoice, Sales Return Invoice, Purchase Invoice, and Purchase Return Invoice.
So let us see how to create these Invoices in RealBooks.
a) Proforma Invoice
Create beautiful proforma invoices for your customers on RealBooks. Proforma Invoice is rarely found in any accounting software online.
So with RealBook, you can create any number of proforma invoices for all your customers preferably on-demand, and minimize of risk of losing your initial or advance payment during pre-sales.
Hence you can invoice later to your customers on behalf of the Proforma, without any further quintessential documents to prove the value of the invoice.
b) Sales Invoice
Creating a direct sales invoice takes no time in RealBooks, provided you have your items and ledgers already entered into your system.
However, if you are willing to use Order to Cash Life Cycle, a Sales Invoice workflow can be created in RealBooks.
I see a few customers often come up and say it is difficult to create an invoice because they want to create an item while creating an Invoice. This is however not a genuine way to create an item.
You should have your items thoroughly checked before creating any item.
Creating an item on the Invoice form means you are not serious about your inventory and you are prone to create duplicate items.
Generating items should be assigned to user responsibility.
The best person for master creation and inventory is your store manager.
It should be created separately whose responsibility is taking care of the inventory and item generation.
c) Sales Return Invoice
Sales Return Invoices are automatically created in RealBooks against Sales Invoices.
If you just enter the name of the party for which a return has been made.
It will automatically show you the list of Invoices entered into the system on the reference tab as shown below.
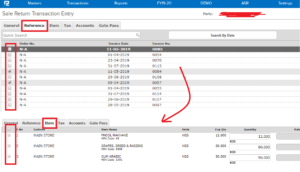
Therefore depending on the Sales Invoice, you create, all the items will be displayed in the Items tab.
It comes from different invoice numbers together where you can select the items and qty that is returned by the debtor.
And leave all other items unmarked and hit save.
The inventory will be affected by your store and a credit note will be generated.
d) Purchase Invoice
A purchase invoice in Realbooks is almost similar to entering a sales invoice.
The only difference is that you have to select the Purchase Invoice from the drop-down Transaction Purchase Menu and select the name of the vendor/creditor from whom the items have been purchased.
The Invoice store’s party’s Invoice/Bill No. Date of the Invoice along with the name of the inventory qty and rate.
If you are using a Procure to Pay Life Cycle, Realbooks also has the provision to enter a Purchase Invoice against a Purchase Order or Purchase Order to GRN (Goods Receipt Note) and then to Purchase Invoice.
e) Purchase Return Invoice
Similar to a sales return invoice that is created against a sales invoice, a Purchase Return Invoice is automatically created in RealBooks against a Purchase Invoice.
A purchase return invoice accepts the name of the party from whom you have made a purchase, so it will automatically show you the list of Purchase Invoices entered into the system on the reference tab.
Select the invoices and fetch the items and select the list of items to be returned.
Hit save to update your inventory and to post a debit note automatically.
f) Service Invoice
Service Invoices can be entered in 2 ways in RealBooks.
- Either as a voucher which falls under transaction -> accounts -> Invoice.
- As a standard Sales Invoice which falls under transaction -> inventory -> sale cycle-> sale. In order to use the standard Invoice as a Services item, use the item master appropriately to configure an item as a service item.
11. Configure RealBooks Accounting Vouchers
A voucher is an accounting document representing an internal intent to make a payment to an external entity, such as a vendor or service provider but not just limited to payment.
As a business owner, you have to continuously record transactions for accounting, inventory management, and statutory compliance.
If you are already using any other accounting system, you must be acquainted with vouchers that are available in an accounting system.
The common use of accounting vouchers in RealBooks are:
a) Receipt Voucher: This voucher is used to enter a Cash Receipt or a Bank Receipt
b) Payment Voucher: Make a Cash Payment or a Bank Payment
c) Journal Voucher: A Journal Voucher is used to adjust the debit and credit amounts without using cash or a bank account.
d) Contra Voucher: Make Contra Entries when a transaction is only between cash & bank accounts.
e) Credit Note: When there is an increase in the Invoice value. A credit note is issued by a purchaser to the seller and vice versa.
f) Debit Note: When there is a decrease in the Invoice value. A debit Note is issued by the purchaser to the seller and vice versa.
g) Invoice: Create an Invoice/Service Invoice without Inventory
h) Advance Receipt: GST is levied on the Advance Receipt. You issue an advance receipt whenever you take advance payment from a customer for a sale that will happen in the future.

12. Opening Balances
The opening balances are primarily the number of funds in a company’s account at the beginning of a new financial period.
It is the first entry in the books of accounts when a company is first starting up its accounts or after a year-end.
So opening balances can be of any ledger account.
The opening also exists for inventory as an opening balance at the beginning of a year.
For an inventory, opening balances are stock items quantity that is prevalent at the end of the year i.e. closing stock.
To enter the ledger opening balance just go to Transactions -> Accounts -> Opening Balances
Enter all and hit search
And it will show you all the ledger accounts where you can feed the opening balances for a particular account.

13. Setup & Configure RealBooks Dashboard
KPIs & Dashboard are some of the important configuration settings for admin and all other users.
The whole point of the web-based dashboard is that it lets you visualize the Key Performance Indicators and other strategic data for your organization at a glance.
RealBooks dashboard tool presents management with the financial information for the practical end of the organization.
It provides a neat and clear dashboard to measure the financial capabilities of a business.
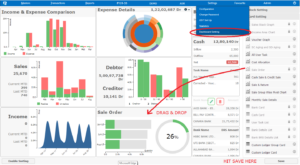
To configure the dashboard in RealBooks go to Settings -> Dashboard Settings.
Drag and Drop the required KPI that you wish to view in your dashboard and hit Save.
If you are looking For any other dashboard or financial KPI that is currently unavailable in the system.
Then we can customize it at additional charges or may be available on request on upcoming new releases.
A RealBooks Dashboard typically looks the way as shown below
14. Multi-User Configurations
RealBooks is capable of supporting a large no. of concurrent users and handle billions of transactions.
If you want to use RealBooks on a Multi-User level.
There are various other options available related to roles and responsibilities that can be configured in RealBooks as per user.
But this is beyond the scope of this article, contact us for Multi-User requirements along with your company details.
15. Configure RealBooks Reports
The most important report on accounting are the compliance report and RealBooks provides all the necessary compliance reports such as
GSTR 1, GSTR 2, GSRT 2A, GSTR 3, GSTR 2A List, GST Advance
And other reports include sales reports, purchase reports, inventory reports, production reports, cost center reports, daily reports, management reports, etc.
When you view the reports in RealBooks usually it seems that there are very few reports.
However, if you analyze the reports you will find that a single report in RealBooks provides multiple reports capabilities.
So review the reports deeply and you will be able to find what you are looking for.
If for any reason a report is not available it can be available on-demand depending on how the report will impact other consumers of RealBooks.
Summary: A Key Takeaway
Today’s online accounting systems are much better than traditional systems in the marketplace.
Time goes by and new technology pops up every single day making our lives better day by day.
Therefore adopting an online accounting system is valuable for an enterprise to stay updated on real time.
I can see that more objections are coming from accountants and CA rather than entrepreneurs when we advise a business to come forward and adopt online systems.
These people are those who are not willing to change themselves.
Change is the step toward success and business needs continuous change to keep going.
So as an entrepreneur to all those entrepreneurs out there.
I would like to welcome you to get a free trial and connect with us for any query you have in regards to your business needs.
And see how RealBooks can help you to solve all your problems when you simply get started.
Move towards a better future with cloud accounting and save this environment by moving towards a paperless office.
Let the earth flourish, get your business on mobile, and enjoy RealBooks 🙂



4 Comments
Billing software for frozen foods
Yes, you can use Realbooks for Invoicing. Let me know if you need any help.
Hi, I am looking for an accounting software where on Bills/Invoice I can print second unit of measurements and items to be grouped based on item category when printing if possible sub total by Item category if multiple categories billed/invoice. Please let me know
So you need ALT UOM on Invoice print. Get in touch with Realbooks. They will charge Rs. 2000 to 3000 to configure that Invoice for you.